Letter “H” Costume

So I had to do a random, last-minute craft tonight, and I’m so proud of the way it turned out I just had to share! My daughter is having “Dr. Seuss” week at daycare. Tomorrow is “dress up as your favorite letter” day, and of course I waited until 7:30 the night before to throw something together. She wanted to dress up as a “H” since that’s the letter her name begins with (of course.) I was racking my brain trying to figure out how I was going to dress her up as a “H.” My husband and I were even googling for ideas… and we found absolutely NOTHING. I went upstairs to grab up some cardboard to cut a “H” out of and somehow affix it to a shirt and had an “aha” moment.

I was actually inspired by a project posted on here previously… the duct tape clutch-see this post. I had a practice clutch lying around that I wasn’t using, and I found it in my craft supply box. If you haven’t read the clutch tutorial, it’s just a piece of felt with duct tape stuck to it. I literally just cut a “H” shape out of one of the sides of it and hot glued it onto a shirt and even made a little matching clip. My daughter absolutely loves it and as an added bonus the duct tape design was Hello Kitty so it goes along with the whole “H” theme. YAY for me! Just think of how cute this could be if you actually spent a lot of time and thought on it… what a cute Halloween costume idea or picture outfit! I think I’m onto something here…
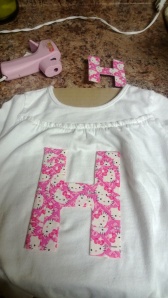
H shirtH clip

Crafting with duct tape

I’ve never made anything using duct tape before. I’ve only used it for its primary use of “fixing” things. So, this was another first for me…

I get the emails from Michaels every week, and they sometimes include project ideas–also on their website, check it out here. They have tons of different project ideas and some are super cute! I received an email a week or 2 ago about making a wristlet purse out of duct tape and decided to give it a go this past weekend!

Hadley was with me during the Michaels shopping trip, so we purchased the Hello Kitty tape of course. They have lots of different colors and designs-I like the animal prints, too. However, keep in mind these rolls of duct tape can get pretty pricey. I think ours rang up $7 for one roll, but I got the cashier to change it because they were in a bin marked $3.99. 🙂 I would suggest buying these on clearance if you see them or using one of the weekly Michaels “40% off one item” coupon.

Supplies:

  • 1 roll of duct tape
  • 1 piece of felt (the stiffer kind you can buy one square of)
  • a button, pin, or other decorative piece for the “clasp” (optional)
  • You may also want a pair of scissors solely for duct tape use because it does get super sticky and leaves a residue on your scissors (optional)
  • magnet, velcro, or other closure (optional)

Now you an either leave your clutch open and just fold over, use a button closure, or I even thought about using magnets since you could hide them easily under the tape. Mine just folds…for now.

Then, I just followed the instructions on the Michaels project page. Tape one side of the felt. Fold up to make your desired clutch or coin purse size, tape the edges. Finally, snip the corners for the top piece in sort of a triangular shape and tape those edges. Add your decorative piece and/or closure and you’re done! 

Here’s how ours turned out.  I suppose this one can be Hadley’s, and I may make another with a different pattern for a “going out” clutch.  These would also make perfect gifts! 

20120601-105343.jpg